Raspberry Pi Internet Radio and Music player - Smartphone Remote Control - Node-RED
Node-RED can be used to create an internet radio and music player that can be controlled from any smartphone on the local network. My motivation for using Node-RED was easy integration into my home automation system – that then means I can also drive the system automatically e.g. making the news come on at 8am. This can just as easily be a standalone project. I also have a touchscreen connected to my Raspberry Pi so I have the web interface there as well.
If you want more information on my home automation system see: Home Automation
The on-board audio on the Raspberry Pi is not HiFi quality. This is easily sorted with a low cost (<£3) add-on board as shown in my Raspberry Pi high quality audio project – that also shows an optional 3+3W amplifier running off the same 5v supply.
See video of the system working:
22/3/2021
From today the BBC has brought its internet streaming inhouse and is not making its internet radio urls available to the public. Hence the links in the stations.m3u file to BBC stations no longer work. I have contacted the BBC asking them to remove this restrictive change. Others, especially those who the BBC is mandated to serve, might consider doing the same.
However a visit to http://www.radiofeeds.co.uk might prove worthwhile.
Hardware required:
- Raspberry Pi – preferably one of the more recent models
- Audio system (e.g. as in HiFi Quality audio project, or any system that can be connected to a line output 3.5mm socket)
Software required (free):
- MPD (Music Player Daemon) and MPC
- Node-RED
A brief word on Node-RED for those who have not used it before. Node-RED is a graphical programming system with some similarities (I am told) to Scratch. A system is programmed using nodes that perform specific functions and flows that transfer data from one node to the next. It was created by IBM as a system to aid the internet of things. The nodes enable a wide range of capability such as:
- MQTT – interact/drive home automation systems
- Dashboard – web interface for home automation/data in/out
- MPD – communicate with MPD to drive music systems
- Web Server – present custom web pages
- Web sockets – read/send data from/to web pages
- Email – send/receive
- Web page analysis - to select data e.g. by tag/name
- Web data collection – e.g. data available in JSON strings such as weather
- Text to speech (dependent on browser support)
And the list goes on. Users can also write their own nodes to add new functionality. The MPD node is an example of a user written node.
Node-RED systems can be copied and easily sent to others – and this system is copied here. So with a copy and paste and a couple of tweaks and you will have a system running.
Steps:
- Load the Pi operating system
- Update Node-RED (control system)
- Add mpd and mpc to play the music
- Setup the Node-RED interface and playlists
The first two steps are covered in the Home Automation project.
Note: All the Pi input can be made directly (with keyboard and monitor connected) or via a remote connection using, for example, Putty. For a detailed description on setting up Putty see the first step of my home automation project.
Add and setup MPD/MPC
Installation is as simple as entering (into terminal):
sudo apt-get -y update
sudo apt-get -y upgrade
sudo apt-get -y install mpd mpc
We now need to setup directories for the music and playlists.
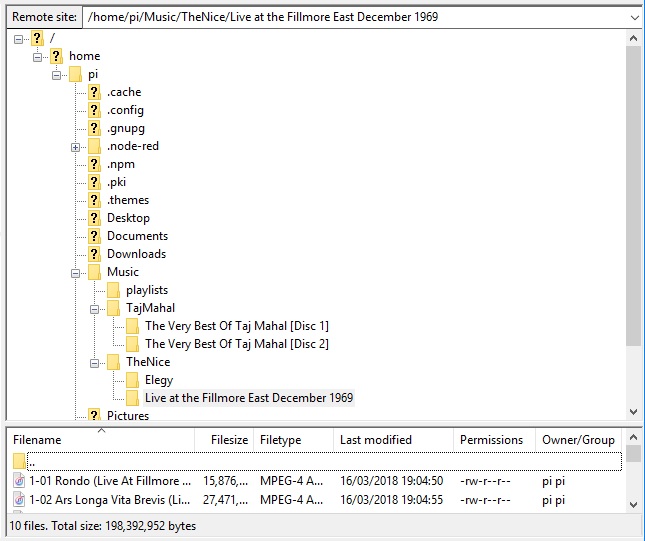
First I added a 'Music' directory in the home/pi folder. Then I added a ‘playlists’ directory in the home/pi/Music folder. I used a FTP program - FileZilla (free) to do this remotely. This is also useful later to upload the radio playlist and music. To use FileZilla enter the Pi IP address in Host, then username (pi) and password, and Port 22 and then click Quickconnect.
We need to tell mpd where to look for music and playlists. So, via Putty:
sudo nano /etc/mpd.conf
change the music directory line to read:
music_directory "/home/pi/Music"
and the playlist line to read:
playlist_directory "/home/pi/Music/playlists"
Save and exit (^X, Y, Enter).
It is easiest to first test MPD with internet radio. So carry on with the project.
Internet Radio
For this we need a playlist of the stations. The playlist is simply a list of the station URLs, one per line. The URLs can be found by searching on ‘Internet Radio URLs’. I also checked these out on my Windows PC using VLC media player. Notepad++ (free download) is a great editor to use as it includes line numbers. My playlist is attached and can be used as a starting point.
I saved the playlist (on my PC) as stations.m3u . I then used FileZilla to put a copy into the playlist folder on the Pi.
We can now test mpd. First we must reboot so mpd reads the playlists. So, via Putty:
sudo reboot
Then restart the Putty session and load the playlist via:
mpc clear
mpc load stations
The 'clear' instruction removes any previously loaded playlists.
Then play:
mpc play 1
‘play 1’plays the station in line 1 of station.m3u. Note that later we will be sending commands directly to MPD and it uses 0 for the first line. You should now hear your radio station (BBC Radio 1 if using my list).
We will add the Node-RED interface later.
Music
For this I simply copied some albums from the itunes folder on my PC to the home/pi/Music directory. This is easy using a FTP program such as FileZilla.
I used the same file structure i.e. Artist>Album>tracks
So the Music folder looks like:

After updating any music mpc needs to update its database. So:
mpc update
A playlist for the TajMahal folder can be created as follows:
mpc clear
mpc ls TajMahal | mpc add
you can check it looks OK via:
mpc playlist
I then found there was a permission problem stopping me save the playlist. This was solved by:
chmod a+w /home/pi/Music/playlists
The playlist can then be saved:
mpc save TajMahal
check it is there by
mpc lsplaylists
By the same procedure I created a playlist for TheNice.
Note that several playlists can be added to the running list. So when selecting playlists one first has to clear the existing list. So test with:
mpc clear
mpc load TajMahal
mpc play
So we now have a couple of albums loaded and a couple of playlists for music and one with the list of our radio stations.
Software volume control
This section can be skipped if you are happy to have a fixed volume output and use the attached audio system for volume control.
The key ingredient, that took a frustrating day to find, is that MPD needs the soft volume control to be called PCM.
sudo nano /etc/asound.conf
add the following:
pcm.sftvol {
    type            softvol
    slave.pcm       "plughw:0"
    control {
        name        "PCM"
        card        0
    }
}
Enter or change the pcm.!default section to:
pcm.!default {
    type             plug
    slave.pcm       "sftvol"
}
^X, Y, Enter to save.
Now we can test it:
speaker-test -D default -c 2 -twav
This should give alternating "front right" and "front left" from the respective speakers.
Node-RED interface
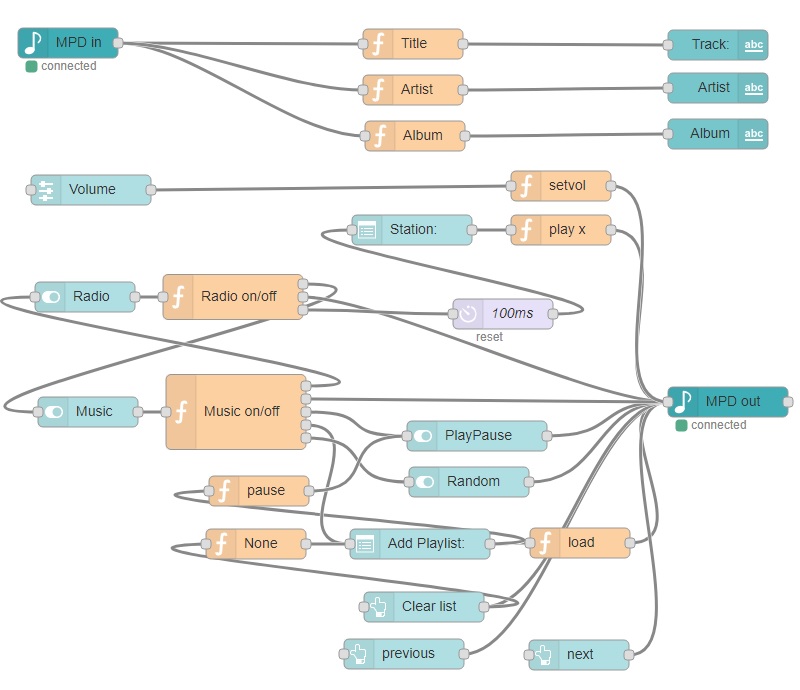
The set of flows is attached so you can paste it into Node-RED and have the basis of a system. You will need to edit the radio and music playlists to you own selection to correspond to the stations.m3u list and the names of the music playlists. These are in nodes ‘Station’ and ‘Add Playlist’. Note that the Station node just outputs a number for each station, starting at 0 for line 1 of stations.m3u .
Before adding the attached flows open Node-RED and install/add the MPD node. This is done via: Manage pallet>Install tab. Then search for MPD and install node-red-contrib-mpd.
It is worth running through an explanation of the setup so you can modify it as required.

The system has to do quite a bit when switching between radio and music because both the radio and music systems use playlists – but in different ways.
The radio just uses one playlist (of stations) and the system continuously plays the selected entry. The music system can add any number of playlists to the playlist it will run through. So the system needs to be able to add playlists and clear the running playing list. There is also an option to have the player select the tracks at random from the running playlist.
The core of the system is the on/off control. There are three states (Radio, Music and Off) that can be handled by two buttons (Radio and Music) that show red when off and green when on. The functions (Radio On/Off and Music On/Off) change several settings when the buttons change state. The first output sends an ‘Off’ to the other when turned on. This prevents both parts running at the same time. The second output sends ‘clear’ to the MPD player when each system is turned off – to clear the running playlist. There is no ‘replace playlist’ command so we need to first ‘clear’ and then ‘load’. This output is also used by radio system to load the stations playlist (load stations) when turned on. The third output on the Radio On/Off function sends a number for the default start station. This is set to ‘3’ for Radio 4 but can be changed as required. It would also be possible to save the last loaded station as a global variable hence reload the last used station. I will leave this as a simple challenge if you want to add this. The command to select the station is delayed by 0.1s to give time for the stations playlist to load first.
The music system has ‘Add Playlist’ and ‘Clear List’ to manage the playlists and ‘random’, ‘pause/play’, ‘previous’ and ‘next’ buttons to control the playing. When the radio is turned on the Radio On/Off function sends commands to set random off, pause and set the ‘Add Playlist’ to the top entry – None.
The 'Clear list' node both sends ‘clear’ to 'MPD out' and, via the function ‘None’, sets the ‘Add Playlist’ dropdown list to the ‘None’ entry.
Adding any playlist sets the play/pause button to pause.
The ‘MPD in’ node sends a JSON string with a load of information. The Title, Artist and Album functions select these bits of data if they are present and puts them to the display.
Please email or use the contact form if you have any questions.
Mike